

IMPORTANT NOTICE:
Registered authors are required to record presentation of their paper according to the instructions on this page.
The deadline for submitting video presentations: June 15th, 2020.
Video submission is only available after registration and camera-ready submission.
As previously announced, SPNCE 2020 will be held in a live online setting to accommodate the current restrictions related to the COVID-19 epidemic. The conference will be held in a fully pre-recorded format as a live stream with a live chat for registrants, as well as other additional online opportunities for getting engaged. Details regarding the exact time and place of the live stream will be announced soon and we kindly ask you for patience as we put everything into place. In the meantime, please pay close attention to instructions regarding the recording of your presentation below.
To give all presenters and viewers of SPNCE 2020 the best possible experience under these new circumstances, we kindly ask authors who will pre-record their presentations to comply with the technical specifications outlined below.
All video submissions will be verified for video/audio quality by EAI and we strongly recommend that you submit your presentation well ahead of the submission deadline. This will allow time for EAI to verify your submission quickly, and for you to re-record and re-submit it in case it does not meet the technical specifications.
- For video, capture a single screen with your presentation/slides in full screen. Advance the slides as if presenting normally. Video feed of the presenter (such as via webcam) is not required.
- For audio, we recommend using an external microphone whenever possible. Using the microphone built into your webcam and/or laptop is also acceptable, but please ensure that you minimize ambient noise.
- Use free screen capture software, such as ShareX (download at https://getsharex.com/) or similar. If using ShareX, please see the attached document “ShareX instructions.pdf” for instructions.
- If using other recording software, please make sure to record the video in 1080p resolution (or your maximum screen resolution) and at 30 frames per second in the MP4 video format.
- Once you have begun recording but before you begin your presentation, please stay on your first slide for 10 seconds without talking. After the initial 10 seconds of silence have elapsed, you may proceed with your presentation normally. This 10 second gap will make it easier for our editors to put the presentations together cleanly.
- Similarly, after you have concluded your presentation, please remain on the final slide for 10 seconds in silence.
- Do not worry about recording your system navigation before you begin and after you end your presentation. Our editors will cut these parts out and only keep the full screen presentation. You do not need to edit your recording in any way.
- Your presentation should be at least 15 minutes in length but should not exceed 20 minutes. It must be voiced in clear and understandable English. The filename must be the title of your paper.
- Before submitting your presentation to us, please send it to your friends or colleagues for review and ask them to confirm that the slides are legible and that the audio is clear.
- To submit your recording, upload your video file to a cloud storage service such as Google Drive, WeTransfer, DropBox, CoreMail or a similar service and send the download link to the Conference Manager at [email protected].
ShareX Instructions
1. Download ShareX from https://getsharex.com/ , install, and run the program. The installation or the initial setup will ask you to download “ffmpeg.exe”. Allow it download.
2. To make sure that the recording is picking up the sound from your microphone (see Screenshot 1):
a. Go to “Task settings” (highlighted),
b. Select “Screen recorder” from the left panel,
c. Click the “Screen recording options” button (highlighted),
d. In the Sources section, click the drop-down menu “Audio source” and select your microphone (highlighted). Your selection may differ slightly from that in the screenshot.
e. You may now close all options windows
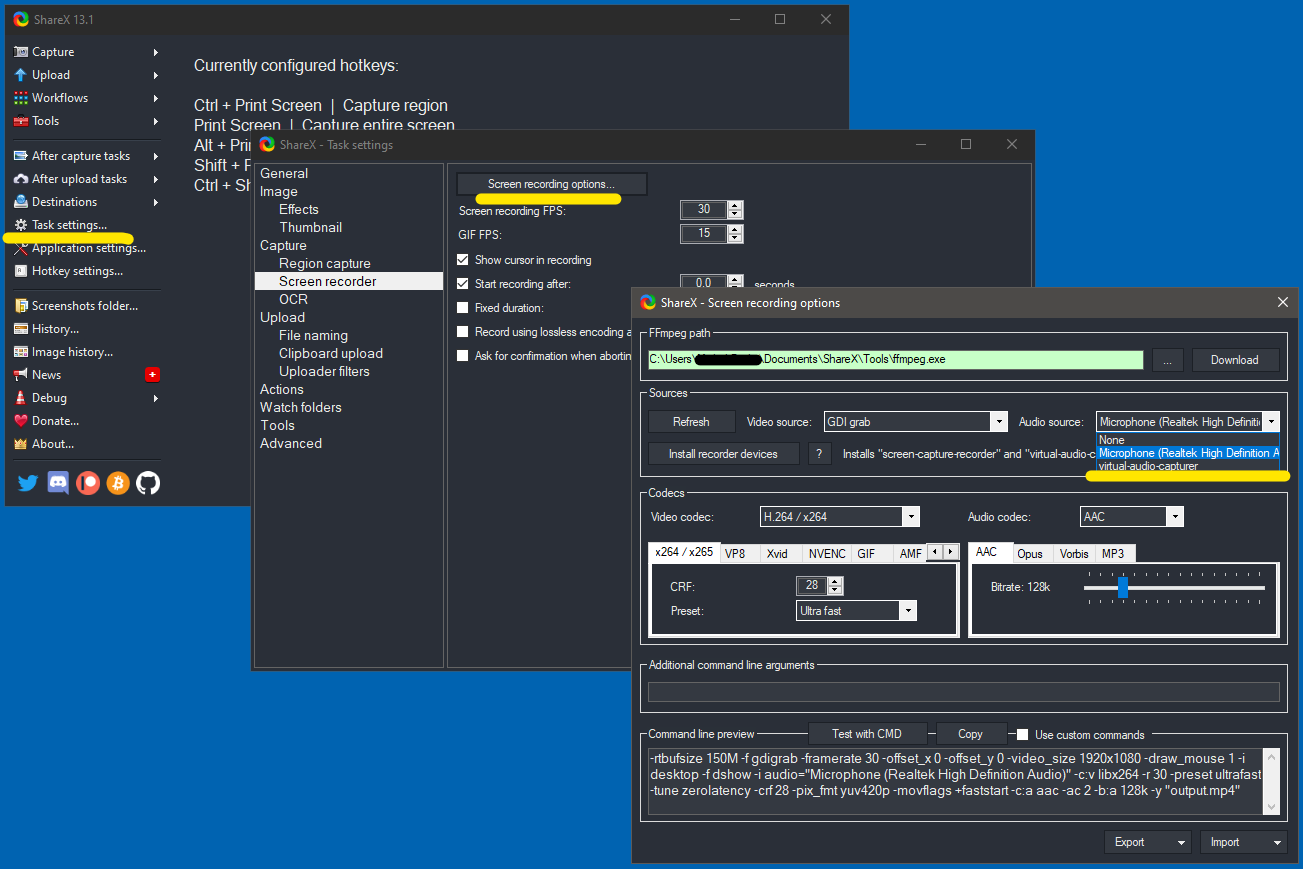
Screenshot 1
3. To start recording:
a. Go to your Desktop (minimize all open applications).
b. Open ShareX.
c. Click “Capture” in the top left (highlighted) and select “Screen recording” (see Screenshot 2)
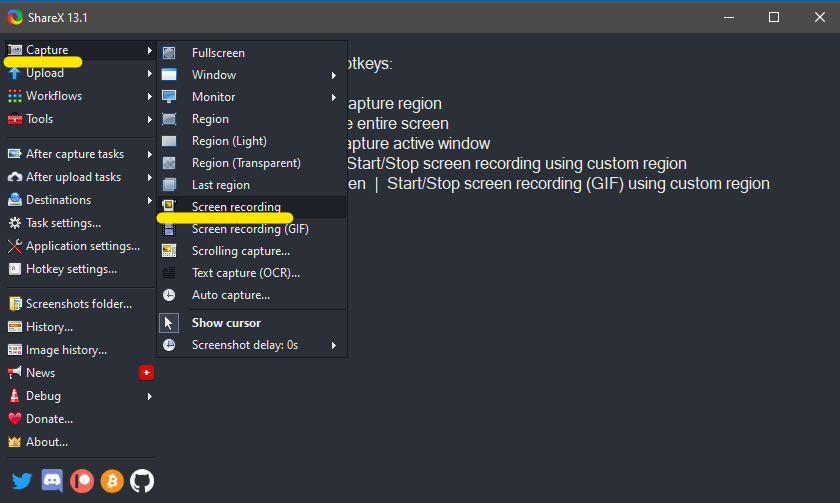
Screenshot 2
d. ShareX will now ask you to specify the recording region of your screen. To record the full screen (see Screenshot 3), navigate the target to one of the top corners of the screen until W: and H: read 1920 and 1080, or your maximum screen resolution.
Please note: full screen selection is only possible when all applications are minimized (see step 3 a.)
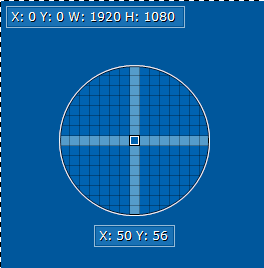
Screenshot 3
e. Once you have selected the screen region, ShareX will begin recording immediately. This will be signified by the red dot in your taskbar (bottom left corner, see Screenshot 4). To stop recording, click the red dot once. Your video file will be saved automatically.
Screenshot 4